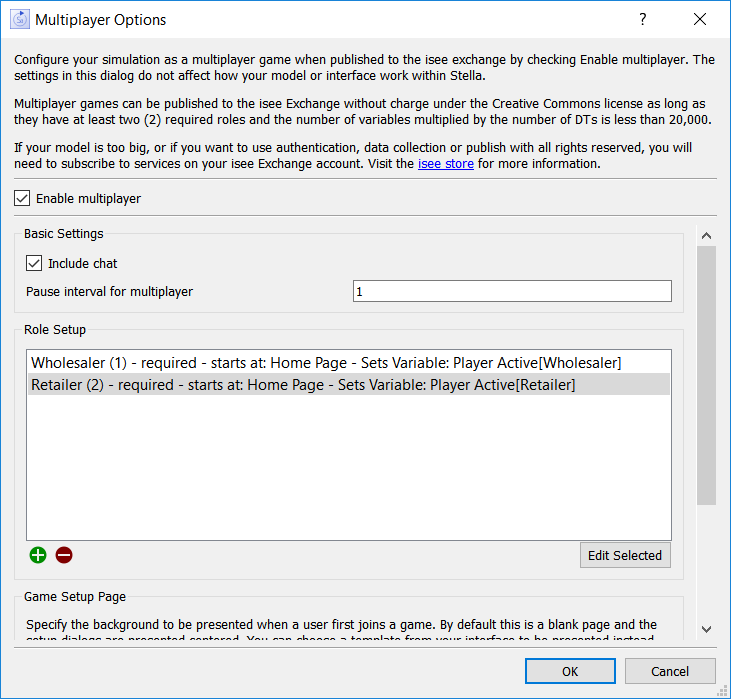
Use the multiplayer options dialog to set up multiplayer games, by defining the roles that people playing the game will take on, setting the pause interval to be used in the game (this is separate from the pause interval set for regular model simulations, to allow flexibility), and optionally configuring the game setup process.
The dialog is accessed from the Interface Settings Properties Panel. See Multiplayer Games for more discussion of multiplayer gaming in general.
If this is checked, then your interface will publish as a multiplayer user interface. If it's not checked, then it will publish as a single user interface, which means it will behave the same when published as it does in Presentation mode. If you have this checked and then uncheck it, you won't be able to change any of the remaining content, but it will all be retained. This makes it possible to publish a multiplayer game and a single user interface (for example, for debriefing) from the same model. If you do this, just be careful that you publish each to the location you intend, as there is no direct feedback during the publishing process as to whether this is checked.
Include Chat, if checked, will include a chat window. Each page will have an icon displayed to open chat. See Chat Messages for more detail.
Pause interval for multiplayer determines the amount of time that passes during each turn in the game. This is kept as a separate setting from the pause interval for the model (on the Model Settings Properties Panel) to allow the model to be used differently when not in multiplayer mode (for example, when configured to support debriefing). The value is in the time units of the model, and defaults to 1.
In order to have a multiplayer game, you need to assign multiple roles and tailor the interface to each of those roles. This is typically done by having the different roles navigate to different decision screens. You can specify the initial screen that each role will be shown here, or you can send everyone to a common screen here and use a conditional navigation Button (Interface) to have them move from that screen to their decision screens.
The current roles are shown in the list. They include the name of the role, the role identifier, whether the role is required, the page that the role will start on, and the optional variable that is set to 1 when that role is active.
To add a role, click on ![]() . The Role Setup dialog will open. Make your selections for that role, and click OK.
. The Role Setup dialog will open. Make your selections for that role, and click OK.
To remove a role, select it, and click on ![]() .
.
To edit a role, select it, then click on Edit Selected. The Role Setup dialog will open. Modify the settings for that role, and click OK.
When users join a game, they're presented with a series of dialogs to provide their name (if they aren't logged into the exchange), start or select a game, set the name of the game if they start one, then select a role within the game and indicate that they're ready to proceed. By default, these dialogs all appear centered on a blank background.
You can set a template to be used as the background. Optionally, you can also specify the position and maximum width and height for the dialogs.
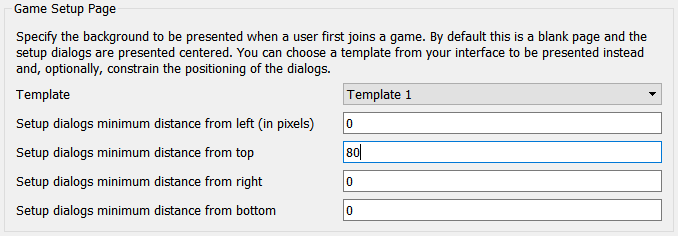
Template is the name of a template in the interface. This will be displayed as the background. The template should have only text and graphics, not any output objects, as this screen is presented before any connection is made to the model, and therefore there are no results.
Setup dialogs minimum distance
By default, the setup dialogs will be centered on the page, and be large enough to present their content intelligibly. Leave all the distances at 0 to retain this behavior.
To prevent the dialogs from covering a portion of the page, use a nonzero value for one or more of the entries. For example, if there's a banner along the top, you could specify a nonzero value there to keep the banner visible at all times.
OK/Cancel
Click OK to accept the changes you've made, or cancel to discard them. Once you click OK, the changes are included in the undo system, and so can be undone. They'll have an effect the next time you publish the interface.